|
Tap8.com |
|
|
|
|
Your program was installed in your c:\Program Files\SRS-X2 folder Also in that folder you will find some background sound files that comes with it. You will also see your Manual folder and your messages folder. 64bit Windows Same as above except you will find the folders in c:\Program
Files(x86)\SRS-X2 folder
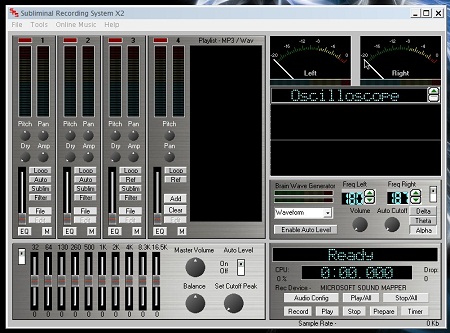
1.
Channel 1 thru 3 2.
Channel 4 can play mp3 and .wav files. You can fill the listbox with
many files and they will play one after another. All channels have their own EQ button
which opens it's own equalizer as well as mute buttons. 3. Main EQ / Master Playback
Controls EQ - This equalizer effects all
sounds being played. Place a checkmark in it's on / off box to activate it. 4.
Audio Playback / Record Meters. 5.
Visual Display Panel. 6.
Bio Rhythm. This section plays sound freqs that
stimulate brain waves making the brain more susceptible to subliminal
suggestions. You will notice 2 freq settings these can be changed from 10 to
600hz. The difference between the tones should fall within the ranges of 1
to 3 Hz (Delta or sleep state), 3 to 6 Hz (Theta or deep meditative state)
or 6 to 12Hz 1 to 3 Hz (Delta or sleep state) set
freq A 150 freq B 151 to 153 7.
Main Recording Panel. These controls start and
stop your recording. It will also play the recorded file when finished. Using Background Files You can only use WAV files in channels
1 thru 3. Channel 4 has a playlist and you can load wav and or mp3 files.
You can load up all of your favorite mp3's into the playlist and they will
play one after another. These are great for personal use but if you are
making professional cd's to sell we suggest you first convert your mp3 to a
wav file by using the built in mp3 to wav Decoder. Something to keep in mind. Wav files
are much bigger in file size than mp3 but wav files are better quality. When
working with wav files as backgrounds it is a good idea to use short files
that you can loop. A short 5 second file of rain can be looped and will
sound like it raining for hours. This will keep your file sizes small and
save you space on your hard drive. When working with files from CDs you
will first need to use a CD extractor software to extract the songs from the
CD and save them as wav files. Once you have them in your computer as wav
files you can load them into the recorder. You can find many free CD
extractors in any search engine. You can also find background files in
our online audio center by simply clicking the button in the recorder. The Internet is HUGE so you can always
find some great background sounds by searching around for "free wav files"
or "free wav loops". You can also record streaming audio from YouTube,
Pandora, Spotify ect. It will record anything you have playing on your
computer. Be creative and record your own!
Recording the shower for a few seconds makes a great rain sound when looped.
The fan is another good one if you like hearing a fan when sleeping. Recording your voice tracks. 1. Make sure you plug your microphone
into the "Mic" input jack in the back of your soundcard. 2. Hit the "Rec Config" Button to set
your recording quality. Best setting is default which records at 44.1khz
stereo. Leave the buffer settings as is unless you experiance skipping if so
you can raise your buffers. Input gain setting should be left as default
unless you need to raise the recording input level or lower it we suggest
you leave this as is until you get used to the recorder. Once set you can
close this window by hitting the "OK" button. 3. Next hit the "Prepair" button. This
will open a window asking you to name your file that you will be recording.
Type a name for the file then hit "Save". The window will close and you will
see the recorder now says "Recorder Ready" it will also start your meter
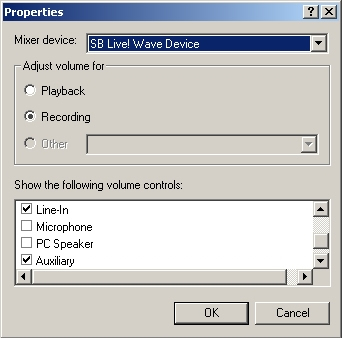
monitoring the recording input. 4. Next open your Windows Sound
Settings and set your recording device to Microphone. Note you select
Microphone if recording your voice and select Stereo Mix when recording your
mixes. 5. Start speaking into the mic and you
should see your meter moving. You can then adjust the mic slider in the
windows record control mixer to set your recording level. You will want to
set your loudest sound to just start to light up the red leds in the meter.
You want optimum levels without keeping it in the red. If it goes into the
red is will sound crankily and distorted. If it is to low then it will
introduce to much hissing noise. You can play around with the levels until
you find the best level for your system. 6. Once you have good levels set hit
the record button to start recording. 7. Speak in a clear voice. Have a list
of your affirmations in front of you and say each one with a 5 to 10 second
pause in-between. Below you will find a list of affirmations you can use.
You can also see these by hitting the "help" button in the recorder. 8. After you have recorded your
affirmations hit the bottom stop button. Then you can hit the play button to
hear it back. If you like it then your all set if not you can simply hit
"Prepare" and start over. Here are the messages you can use
in your recordings you can also use these as templates to make up your own : Note : If you do not have a
microphone you can use the text 2 speech recorder so you can record the
computer voice that will speak any text you enter. For more info hit the
"Text 2 Speech" link on the left. ---Self-esteem ---Winning Mixing all files to one final track
you can burn to CD or make MP3's. By this step you should already have a
voice track recorded and background files picked out to be used. This
example shows how to make a Traditional Subliminal Recording by masking your
voice with background sounds or music. If you would like to make advanced
recordings please see the menu on the left. 1. Load your voice file into channel 1
by hitting the "File" button in that channel then browse to your file and
select it then hit ok. 2. Hit the play button to make sure
you hear it playing then hit stop. You might also want to loop this file if
it is a small one that you want played over and over. 3. Load in your background tracks.
Same as above simply hit the "File" button in each channel you want to use.
When you have all files loaded you will want to get the record section ready
again by hitting the "Prepare" button and naming your new file. This will
also make the recorder say "Recorder Ready". You can now hit the "Play"
button so your files start playing. 4. Now before you start mixing your
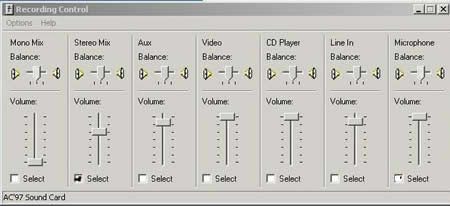
levels it is very important to set your Windows record device to Stereo Mix
so your computer knows to record whats playing instead of the microphone.
Right click the little speaker in your tray then in win 10 choose sound
settings or in win 7 and below select record devices. Once open set your
record input to Stereo Mix. Theres many videos on youtube that shows you how
to setup your stereo mix if you have any problems. Just go there and search
for how to setup stereo mix. 5. Now that you have your meter
monitoring the sounds being played you can start to mix the files. First
start the background track and turn it up to a good recording level just
before the red. Now turn up your voice track so you can hear it then start
turning it down until it just goes away. You want that fine line where you
just cant seem to tell its there because the background is covering it up.
That is where you will want to leave it. To test to make sure the voice is
infact still there simply turn down the background track while the voice is
still playing you should hear the voice. Then turn the background back up
and it will hide the voice again. Now you are ready to record your final
file. 6. Hit the record button. The recorder
will now be recording everything you are playing. When done hit stop. You
can now hit play to hear it back. If it sounds good and you cant hear the
voice then you can close the recorder and burn your new file to a CD using
the CD burning software that came with your CD burner. Simply burn it as you
would any other audio cd. Brain Wave Generator This plays sound freqs that stimulate
brain waves making the brain more susceptible to subliminal suggestions. You
will notice 2 freq settings these can be changed from 10 to 600hz. The
difference between the tones should fall within the ranges of 1 to 3 Hz
(Delta or sleep state), 3 to 6 Hz (Theta or deep meditative state) or 6 to
12Hz 1 to 3 Hz (Delta or sleep state) set
freq A 150 freq B 151 to 153 Auto Level feature : The auto level feature is used if you
have background music that goes up and down in volume alot. The autolevel
can follow the meter on a background channel then turn your voice channel up
and down accordingly. If your background goes silent then your voice file
will automatically be turned down. To use this you will load your voice
file into channel 1 or 2. The place a checkmark in the "Auto" box in it's
channel. Now load your background file into channel 3 or 4. Place a
checkmark in the "Ref" box in it's channel. This will tell the recorder that
you want your voice to follow the volume of the background channel that you
have selected as the Reference. Next hit the "On" button in the main
Autolevel section. Hit "Play" ok now that it is playing you can start
turning down the main Autolevel knob which sets the volume cutoff level of
your voice. Which means the main autolevel knob sets how high the voice
slider can go because you still want to make sure the voice stays hidden. I
find it best to manually set my voice level and make a mental note where the
slider is then turn on the auto level and set the knob so that the voice
slider can move up to where I had set it manually. Once everything is set
right you should not hear the voice because the background music covers it
up but if you turn down your background music you should see the voice
slider turn itself down automatically. This feature is best used if you have
a list of background music in your channel 4 playlist and you want to let
them all record without having to sit and turn the voice down every time a
song changes. Final Recording Tips 1. Make sure you are using files that
have been recorded of good quality. If you start off with low quality files
your final recording will be low quality as well. 2. Add Bio Rhythm to your recordings.
Mix the bio rhythm at the same level as you do your voice file so you cant
tell its there. This helps the subliminal mind better focus of whats going
on behind the scenes. 3. Use auto levels if your background
tracks have allot of silent parts that would let the voice bleed through.
When setting the auto level first set it manually by hand so you can see how
far up it needs to go. Then turn on the auto level and adjust its horizontal
cutoff slider so it will not go above where you had it set. 4. Use small wav files and loop them
to save hard drive space Text 2 Speech Recorder The Text to Speech recorder is
used to record computer spoken text into wav files that you can use in your
subliminal recordings. You can load any text file as well as create new ones
edit and save current files. These work very well and it is a fast easy way
to create your voice tracks. Interface Buttons Speak - Start the computer
speaking the text. How to : 1. In the lower box on the
left click a message file to load. You will then see it loaded in the box on
the right. 2. Once the file is loaded
you will see the text in the main window. You can edit the file if needed.
You now want to hit the "Speak" button and make sure all the words are
clear. Sometimes you will need to spell some words different so that the
computer knows how to speak them. You will find that the computer does a
pretty good job and you probably wont have to change anything. You can also
change the voice speed and voices if you like. You can also add more
messages or edit or add your own. 3. Once satisfied with the
sound of the voice you are ready to save it to a .wav file that you can load
in the recorder. Just click the "Create Wav" button then a box will open so
you can name the file and choose which folder to save it in so you can find
it to load in the recorder. Silent Subliminal Technique This technique lets you easily make
subliminal recordings that use no background sound and when played back you
do not hear anything playing. One of the things that this is good
for when compared to using background music is that no matter what sooner or
later you get tired of hearing the same background over and over. Wouldn't
it be nice to get the messages into your mind without hearing a sound? Well
now you can and this really works very well. So how is it done? You can archive this by moving your
voice to a frequency in the upper portion of human hearing. We don't want to
hear it BUT we still want it to vibrate the inner ear so our brain can still
decode it. Human ears can hear things up to around 20khz so by moving our
voice up to 16.5khz then apply a filter to filter out anything above or
below 16.5khz we can end up with a recording that is still playing very load
( proof is by looking at your output meter as it will still be very high )
but you will not hear anything well at least you think your not hearing
anything but in fact you really are. Sound interesting? The quickest way to make a silent
subliminal recording 1. Load your voice file into
channel 1 and check "Loop" 2. Hit play and turn it up so
it peaks just before the red on its channel meter. 3. Place a checkmark in "Send"
this will send your voice through the Brain Wave Frequency Generator which
moves the voice to 16.5khz by default. ( You can change the frequency in the
"Option" panel but I suggest you leave it as is until you get the hang of
it) 4. Turn the "Dry" volume knob
all the way down and turn the "Wet" knob to half way or above. The Dry knob
is the volume of your voice in its original state. The Wet knob turns the
modulation up which is the voice after it has been run through the Brain
Wave Generator. As time goes on you can also play around with these knobs to
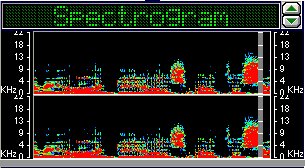
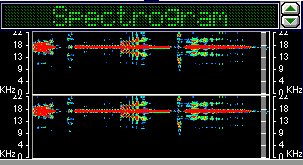
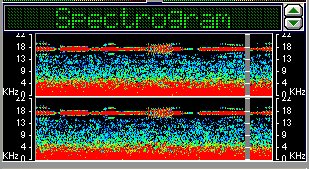
achieve different effects. 5. Now change your Display
panel to "Spectrogram" now you will see your voice has moved up to 16.5khz
BUT there is still some sounds getting through that we dont want and we can
still hear the voice but its high and scratchy sounding. So next we need to
place a checkmark in the "Filter" box and poof now you shouldn't be able to
hear it and looking at the Spectrogram we can see that the voice is now a
nice fine line at 16.5khz. 6. Now that the voice is
playing in the 16.5khz range and we have applied our filter we can turn up
the slider to make sure the meter is still peaking close to the red which
lets us know its still playing very loud. You can now ready your recorder as
described in the Mixing section and record your new silent subliminal
recording. So in a nutshell Load your voice file, checkmark Loop,
Send and Filter. Then turn the Dry knob all the way down and the Wet knob
half or above. Then turn the slider up to just before the red. Look at the
Spectrogram to see your message at a high freq. Then record it. You can also use this technique with
background music as well and is still very effective. Something else you can try is to
checkmark "Send" turn the "Wet" knob up to around 2:00 then instead of
applying the filter just turn down the "Dry" knob until you just cant seem
to hear it. This way you will have moved the voice to a high frequency but
also added some of the natural low voice as well. This works great when
using background music but not as well for Silent subliminals without
backgrounds. Stereo Confusion Many people have asked about stereo
confusion subliminal recording which is merely putting messages in one ear
and different messages in the other ear. You can also make these kind of
recordings. Each channel has it's own "Pan" knob
which is a balance knob. You can load a voice file in channel 1 then set the
"Pan" knob all the way left. Then load another file into channel 2 and set
its "Pan" knob all the way right. Now when you play that back you will hear
a voice in one ear and a different voice in the other ear. You can then add
background music if you want or you can even just keep adding voices in all
channels then record them into one file. You could then load that one file
in channel 1 and keep adding as many voices as you wish with no limit. Recording Self Hypnosis Recordings You can also make very powerful self
hypnosis recordings very easy with your new recorder. These type of
recordings you want to hear the voice loud and clear with some very soft
background music. You can also use the Brain wave generator to produce some
very nice effects. You will record your voice in the same way you do when
recording a subliminal voice track. But when mixing you do not want to hide
the voice. Mix it so its loud and clear then mix in some soft music or
anything you want. Add some Theta brain waves then record that into 1 final
file. You can find many free pre written
self hypnosis scripts on the Internet. Simply goto your favorite search
engine and search for free hypnosis scripts. Simply pick one out then read it into
your microphone and record it or copy and paste the text into the built in
Text to Speech recorder and let the computer speak it for you then record
it. These type of recording are best
listened to with headphones so the brain wave generator has its greatest
effect. You can also take it a step further by
also adding hidden subliminal messages throughout the self hypnosis
recording. Youtube is also a great place to find pre recorded scripts.
Simply play one and record it. The sky is the limit. Troubleshooting My Meter will not move (Windows XP
thru 7) when recording. Now you should have a line that
records everything being played if not you will need to upgrade your
soundcard to a more modern card. Windows 10: Right click the little speaker in your tray. Click "Open
Sound Settings". Then on the right side of the settings page click the link
that says "Sound Control Panel". Once that is open click the recording tab at the top. You
will now see a list of your recording devices. In that list you want to see
"Stereo Mix" if you dont right click in the white part of that list box and
you shoulod then see a box that says "Show disabled devices" and "Show
disconnected devices". Place a checkmark in both then click off the box. Now
you should see Stereo Mix in your list. Right click on Stereo Mix and click
enable. Then click off the box and click once on Stereo Mix so it is
selected then click the "Set Default" button. Now your Stereo Mix is set as
your recording device. Click the Properties button then the levels tab at
the top andmake sure your level is up half way or so. This level setting may
need to be tweeked as you record but once you have it set you wont need to
do it again. Now close the settings panel and record your mix. If you do not have Stereo Mix as an option that usually
means when windows was loaded on your computer they used the default windows
sound driver instead of the real one that goes on your computer. You will
need to goto google do a search for your computer model sound driver. Find
your manufacturers website then go there and download the latest sound
driver for your computer model. You should then have stereo mix as a record
device. If you still have no stereo mix your last option is install
the free VB Cable Driver found here. http://vb-audio.com/Cable you want the
download at the top that says VB-Cable Virtual Audio Device. Once installed you will now see VB-Cable Output as a
recording device in your windows record panel select it and set as default.
Then select it and click properties. Then click the "Listen" tab at the top.
Then checkmark "Listen to this device" then in the dropdown list where it
says "Playback thru this device" select your speakers. Click OK. Now click
the "Playback" Tab and select VB-Cable Input and click Set as Default. So in a nutshell anytime you want to record what you hear
playing you HAVE to set Stereo Mix as your record device or VB-Cable if you
have no Stereo Mix. If you want to record your Microphone you will set
Microphone as your default record device. You can also find alot of videos on youtube that shows you
how to enable your Stereo Mix. Just go there and do a search for How to
enable Stereo Mix in Windows 10 I cant hear the Bio Rhythm on my
laptop For more information and step by
step instructions hit the "Help" buttons in the recorder.
|